Patisson and Basil Bread
Anyone who has grown squash of any kind knows how quickly they can grow and how soon you have a glut and need to think of interesting things to do with them.
 |
| Patty Pan |
My patty pans came through about two weeks ago and I've been loving them lightly grilled with a little sea salt and nothing else. Identifiable by their distinctive crimped edges, the French name for patty pan is patisson which comes from a word for a cake made in a scalloped mould. They have an almost creamy flavour and are best picked small. However, today I noticed this 400 gram monster which had been hiding from me and I knew it was time to dream up something different.
Right next to my patty pan and courgette beds my basil is growing great guns, so I thought I would create my own version of the slightly better known courgette bread. It works well as it packs in extra flavour, but also a beautiful moistness. It's fairly easy on the eye with the colourful basil running through it as well.
 |
| Fresh Basil |
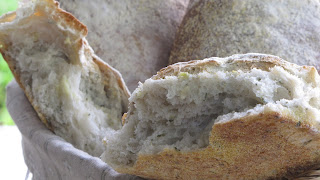
One thing to note here is that the patty pan brings extra liquid, therefore increasing your hydration. Using a 65% hydration as I am here, plus the squash gives you a ciabatta like consistency for your dough. This means you really need a mixer. If doing it by hand you either need to squeeze every last drop of moisture from the patty pan or reduce your hydration.
 |
| The higher hydration gives this bread a beautiful soft open crumb |
You can of course experiment with the amount of patty pan and basil. I'm using 15g of fresh basil which gives quite a nice light complimentary flavour. Remember that my basil was 30 seconds from picking to chopping, if you are using basil that's not quite so fresh you may need to increase the amount.
I'm using the basic recipe for white bread for this recipe. All I'm doing is adding in grated patty pan and finely chopped basil to the dry ingredients and continuing on as normal. Please read my post on 'White Bread White Choice' for all the details on ingredients and techniques. It will also be handy to read the 'Ciabatta Matters' post for notes on dealing with higher hydration breads.
Ingredients
500g strong baker’s flour
200g grated patty pan
15g chopped fresh basil
200g grated patty pan
15g chopped fresh basil
7g of fast acting dried yeast
325 ml water at room / blood temperature
9g salt
12 g caster sugar
15 ml vegetable oil
Utensils
Bread mixer with dough hook
Electric weighing scales
Dough cutter
Dough cutter
Baking tray
Cooling rack
Begin by sieving your flour into the bowl of your mixer. Add in the salt, sugar and dried yeast. Give it a mix.
Add your grated patty pan and chopped basil
Add your grated patty pan and chopped basil
Make a well in the bottom and add in your water and oil.
Turn on your mixer, slowly at first and then start to speed up. You may need to use a rubber spatula to get all the flour incorporated. Once mixed, turn the mixer up high. It will look wet and you will think at first that it will never come together. Have faith and it will. It took me almost 20 minutes. What you are looking for is the the dough to come away cleanly from the sides of the mixing bowl as it's mixing. When you stop the machine and lift the dough hook you should be able to stretch your dough even though it's so wet.
Turn on your mixer, slowly at first and then start to speed up. You may need to use a rubber spatula to get all the flour incorporated. Once mixed, turn the mixer up high. It will look wet and you will think at first that it will never come together. Have faith and it will. It took me almost 20 minutes. What you are looking for is the the dough to come away cleanly from the sides of the mixing bowl as it's mixing. When you stop the machine and lift the dough hook you should be able to stretch your dough even though it's so wet.
When you are happy, return to a lightly oiled bowl and allow to double in size at room temperature.
Using your scales divide the dough into equal sizes according to how you are going to do your final prove.
I’m doing three loaves so my 1050g of raw dough went into three loaves of 350g.
Prepare your cold baking tray. I dusted mine with fine polenta as I like the crunch it brings but you can use flour.
Pre heat your oven to 220 ° C.
Wash and wet your hands between forming each loaf. This will mean the dough will not stick to you.
Using your dough cutter, cut and weigh the right amount. For me 350 grams. Give it a quick stretch, fold it over on itself and then shape into your desired shape. Lay on to the prepared tray. Liberally sprinkle flour on top.
Cover and leave to prove again. Depending on the weather and temperature of your kitchen 40 - 45 minutes. Don't expect a massive doubling in size from this one.
These three loaves took 30 minutes but remember that all ovens are different so use your judgment. You want a loaf which is coloured on the crust, feels ‘light for the size’ and sounds hollow when tapped. Those three indicators should do you well.


1 comment:
This looks like a great recipe and I'm keen to try it this week. Do you know if the bread freezes well? Thank you.
Post a Comment